[Feast] Feast(Feature Store)란? + Feast 사용법
머신러닝에서 모델을 학습할 때 Raw Data(db, parquet, BigQuery등)에서 Feature를 뽑아서 사용한다.
Feature란 테이블의 컬럼 중에서 설명변수(=예측변수)에 해당한다.
1. Feature Store가 필요한 이유
Feature Store가 없는 경우 아래와 같이 ML모델과 RawData간에 직접적인 의존성이 생긴다.
이렇게 될 경우 Feature를 재사용하기 힘들고 ML개발자가 직접 Feature까지 신경써야하는 문제점이 있다.

이러한 문제를 해결하기 위해 도입된게 Feature Store이다. 아래의 그림처럼 ML모델과 RawData사이에 Feature Store를 도입함으로써 이미 정의한 Feature를 재사용하고 ML모델과 RawDatat사이의 직접적인 의존성을 제거할 수 있게 되었다.

결론적으로 Feature Store는 두 가지 일을 한다고 보면 된다.
1. Feature를 저장하는 기능
2. Feature를 제공하는 기능
2. Feast 사용법
수많은 Feature Store 중 오픈소스인 Feast의 사용법을 알아본다.

2.1 Feast 설치
pip명령어를 통해 feast를 설치해준다.
pip install feast2.2 Feast Repository 생성 및 초기화
feast init my_feast먼저 pycharm을 통해 새 프로젝트를 하나 만들고 feast를 init하면 프로젝트 내에 아래와 같이 feature_repo가 생성된다.
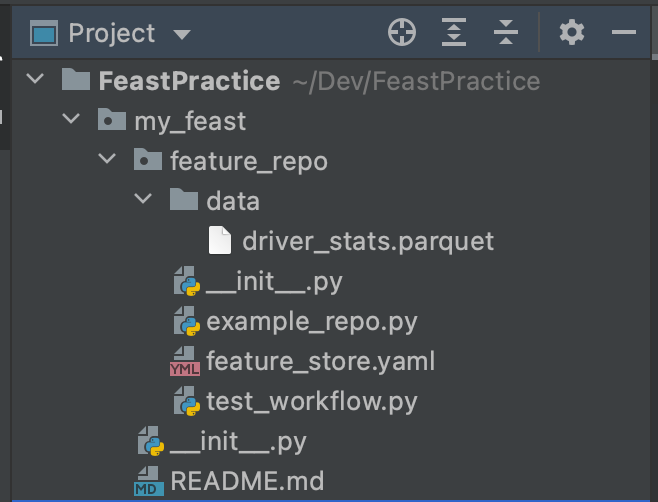
- data/ 는 parquet포맷의 raw데이터를 보관하고
- example_repo.py에는 feature를 정의하는 예제가 담겨있다.
- feature_store.yaml파일에는 feast에 대한 설정 정보가 있다.
- test_workflow.py에는 만들어진 feature를 어떻게 적용하고 사용하는지에 대한 예가 있다.
driver_stats.parquet파일은 https://www.parquet-viewer.com/ 에서 읽어보면 다음과 같은 정보를 담고 있다.

위의 Table에서 Feature를 정의하고 사용할 수 있게 하는게 Feast의 주 목적이다.
2.3 Feature View, Feature, Entity, Data Source 정의 및 apply
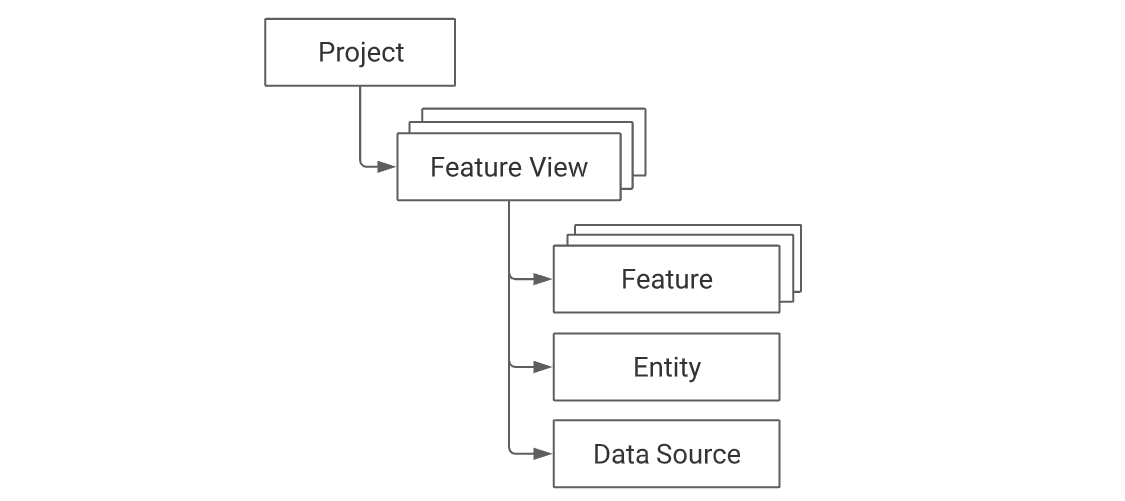
Feast 프로젝트에서는 위와같은 논리 구조를 가진다.
프로젝트는 여러개의 Feature View를 가질 수 있고,
Feature View는 여러개의 Feature 담고 있는 Feature그룹의 역할을 한다.
Entity는 Feature들이 컬럼 값들을 가져올 때 key 역할을 한다.
example_repo.py를 보면
# Entity를 정의하고 key를 driver_id로 정의함
driver = Entity(name="driver", join_keys=["driver_id"])

# parquet파일을 Data Source로 사용, 상황에 따라 BigQuery등으로 변경 가능
driver_stats_source = FileSource(
    name="driver_hourly_stats_source",
    path="/Users/daeyong/Dev/FeastPractice/my_feast/feature_repo/data/driver_stats.parquet",
    timestamp_field="event_timestamp",
    created_timestamp_column="created",
)

#Feature View 정의
driver_stats_fv = FeatureView(
    # driver_hourly_stats라는 이름을 갖는 FeatureView를 정의
    name="driver_hourly_stats",
    # Entity는 위에서 정의한 driver를 사용
    entities=[driver],
    ttl=timedelta(days=1),
    # FeatureView안에 3개의 Feature를 정의한다.
    schema=[
        Field(name="conv_rate", dtype=Float32),
        Field(name="acc_rate", dtype=Float32),
        Field(name="avg_daily_trips", dtype=Int64, description="Average daily trips"),
    ],
    online=True,
    # Data Source는 driver_stats.parquet에서 가져온다.
    source=driver_stats_source,
    tags={"team": "driver_performance"},
)
위와 같이 Feature View, Feature, Entity, Data Source 를 정의하고 feature_repo로 이동하여 터미널에 다음과 같이 입력해보면
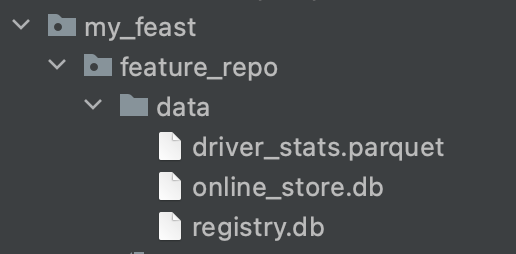
feature_repo % feast apply
Feature View등 정의과 완료되고 data디렉토리 아래에 online_store.db와 registry.db가 생성된 것을 볼 수 있다.
registry.db에 정의 된 Feature View, Feature등의 정보가 저장된다.
2.4 Feature View 확인하기 (feast ui)
feast에는 기본적으로 웹UI를 통해 featrue 정보를 확인 할 수 있는 기능을 제공한다.
터미널에 feast ui를 입력하고 브라우저를 통해 http://0.0.0.0:8888 에 접속해보면
위에서 정의한 Feature View (driver_houlry_stats) 가 잘 보인다.

2.5 Feature 검색(retrieval)
Feature 검색은 Offline Store와 Onlie Store에서 가져오는 두 가지 방법이 있다.
아래와 같은 구조로 설계가 되어있다.

2.5.1 Offline Store 검색
Offline Store 검색은 Data Source(driver_stats.parquet)에서 Entity와 Feature를 이용하여 직접 데이터를 가져오는 것이다.
DB의 select과 거의 유사하다고 보면 된다. offline store에서 불러온 data는 ML모델을 트레이닝 하기 위해 사용된다.
test_workflow.py에서 아래 함수만 실행시켜 보자
def fetch_historical_features_entity_df(store: FeatureStore, for_batch_scoring: bool):
    # Note: see https://docs.feast.dev/getting-started/concepts/feature-retrieval for more details on how to retrieve
    # for all entities in the offline store instead
    entity_df = pd.DataFrame.from_dict(
        {
            # entity's join key -> entity values
            "driver_id": [1001, 1002, 1003],
            # "event_timestamp" (reserved key) -> timestamps
            "event_timestamp": [
                datetime(2021, 4, 12, 10, 59, 42),
                datetime(2021, 4, 12, 8, 12, 10),
                datetime(2021, 4, 12, 16, 40, 26),
            ],
            # (optional) label name -> label values. Feast does not process these
            "label_driver_reported_satisfaction": [1, 5, 3],
            # values we're using for an on-demand transformation
            "val_to_add": [1, 2, 3],
            "val_to_add_2": [10, 20, 30],
        }
    )
    # For batch scoring, we want the latest timestamps
    if for_batch_scoring:
        entity_df["event_timestamp"] = pd.to_datetime("now", utc=True)

    training_df = store.get_historical_features(
        entity_df=entity_df,
        features=[
            "driver_hourly_stats:conv_rate",
            "driver_hourly_stats:acc_rate",
            "driver_hourly_stats:avg_daily_trips",
            "transformed_conv_rate:conv_rate_plus_val1",
            "transformed_conv_rate:conv_rate_plus_val2",
        ],
    ).to_df()
    print(training_df.head())
driver_id, event_timestamp, label_driver_reported_statisfaction등 entity_df에 맞는 데이터를 불러온다.
[Output]
--- Historical features for training ---
   driver_id           event_timestamp  label_driver_reported_satisfaction  \
0       1001 2021-04-12 10:59:42+00:00                                   1
1       1002 2021-04-12 08:12:10+00:00                                   5
2       1003 2021-04-12 16:40:26+00:00                                   3

   val_to_add  val_to_add_2  conv_rate  acc_rate  avg_daily_trips  \
0           1            10   0.470497  0.449880               76
1           2            20   0.804600  0.321440              160
2           3            30   0.149247  0.318629              147

   conv_rate_plus_val1  conv_rate_plus_val2
0             1.470497            10.470497
1             2.804600            20.804600
2             3.149247            30.149247
2.5.2 Online Store 검색(+ 저장)
Online Store 검색은 Model을 Servring 할 때 최신의 데이터를 이용하여 빠르게 응답해야 할 때 사용된다.
(예를들면 사용자의 최근 쿠키를 이용한 추천 시스템 등)
따라서 Online Store는 Offline Store와 다른 저장소에 저장된다. 예제에서는 online_store.db에 저장되나 redis나 firestore를 활용할 수도 있다.
Online Store에 데이터를 저장하는 방법은 두 가지가 있다. 첫 번째는 터미널에 직접 명령어를 입력하는 방법이고 두 번째는 코드를 통한 방법이다.
2.5.2.1 명령어를 통한 Online Store 저장
$ NOW_DATE=$(date -u +"%Y-%m-%dT%H:%M:%S")
$ feast materialize-incremental $NOW_DATE
이렇게 현재시간으로 materialize를 해주면 online_store.db에 데이터가 반영되고 feast ui상으로 materialization intervals를 확인 할 수 있다.

2.5.2.2 코드를 통한 Onlie Store 저장
store = FeatureStore(repo_path=".")
store.materialize_incremental(end_date=datetime.now())
2.5.2.3 Online Store 검색
store = FeatureStore(repo_path=".")

feature_vector = store.get_online_features(
    feature_refs=[
        'driver_hourly_stats:conv_rate',
        'driver_hourly_stats:acc_rate',
        'driver_hourly_stats:avg_daily_trips'
    ],  # 로드 할 feature를 넣어준다
    entity_rows=[{"driver_id": 1001}]  # Entity 기준으로 적는다.
).to_dict()

print(feature_vector)
[Output]
